Table of Contents
- Logging In
- Creating a profile
Changing Form Data Using Excel Tool
- Editing Data
- Adding Rows
Uploading Altered/New Forms Back to opLYNX
- Changing Column Order
- Viewing Selected Statuses
- Seeing Form Count
⚠️DO NOT change the Create date, Complete Date, or the CreateUser_ID

Purpose
The purpose of the Excel-Tool is to change several Forms from opLYNX and then reload it back into opLYNX. Some examples include:
- Deleting expired forms that are not required (forms set up that do not need to be
completed. - Adding new forms to a large component type, like a new regulatory form for ALL wells
or wells in a certain run. - Changing the due dates, statuses, or locations on existing forms.
Using the Excel Add-In Tool
Now that the Add-In has been installed in Excel and you have Excel open, we can start:
Login
- From Excel, go to the opLYNX tab on your ribbon

- Choose the Settings Gear

- Select PROD or TEST. Remember, this has to match the environment where your
username and asset were set up in opLYNX Central, ie Company prod. You cannot
access an environment where the user and asset were not set up with the Excel Tool. - Now click Login

- Enter the username and password.
- Then you will select the environment from the list ie Company name (you already
selected Prod in settings) and click OK.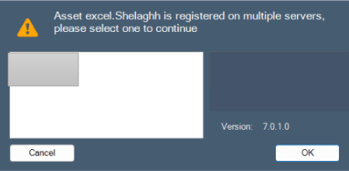
- Then it will run, it takes a minute.
Creating a Profile
- Click 'Profiles' from the ribbon
- Click 'Create New Profile' You can create one profile for each form. Or you can rerun an older 'profile' from the selection in the table.
Now you can select the data you need to retrieve from opLYNX. This will only be FORMS and
nothing related to production.
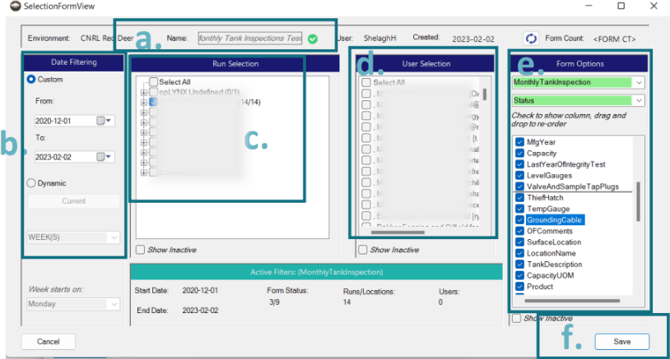
- Name: Create a Profile Name ex. “RMH Monthly Tank Insp. 2022”
- Date Filtering: Choose "Custom" or "Dynamic" to set more standard. Choose your
dates going back as far as you need. - Run Selection: Use the filters and boxes to select the areas you need to see. To see old data in active runs, click “Show Inactive”
- User Selection: You do not usually change this section, unless you are certain you only want to see forms assigned to a user. Otherwise, leave it blank and you will see forms in that role/run.
- Form Options:
- Type: Select the actual form from the drop-down list
- Status: you could filter to certain types i.e. if you needed to delete all suspended tank inspections, or only Completed forms, In Progress, etc.
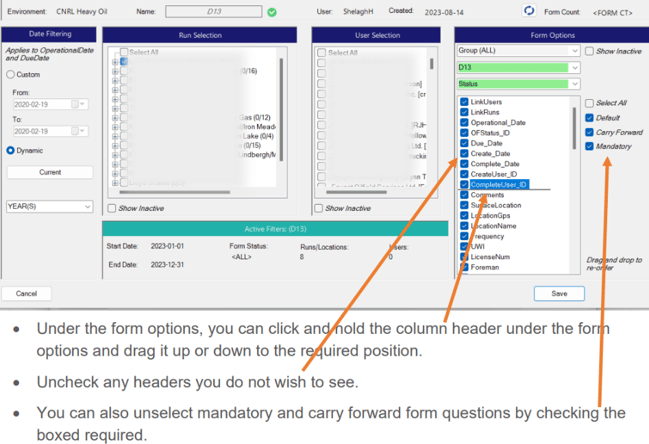
- In this section you can select and unselect columns you wish to see or not see.
- You can also drag and drop the columns to appear in the order you prefer.
- Hit Save.
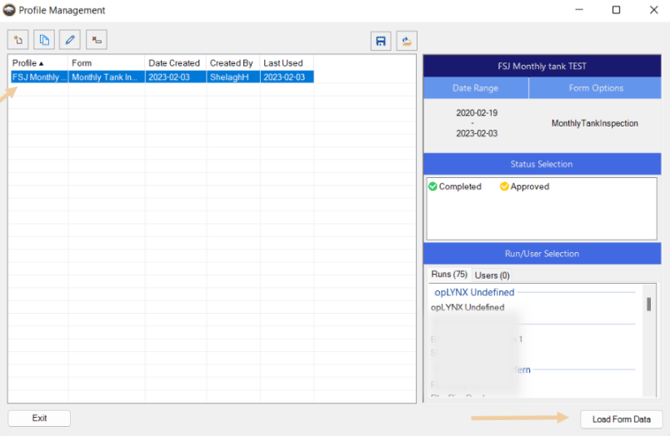
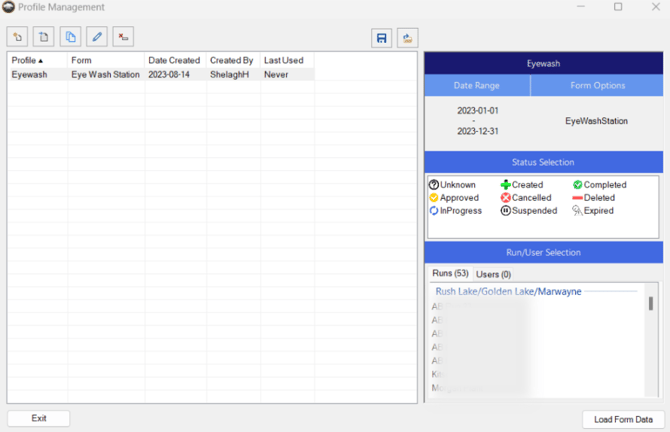
A new window will open, this will list any new or old "profiles" you have created. A profile is a set of parameters for the report you wish to pull
Changing Form Data Using Excel Tool
Now that you have run your report and pulled forms from opLYNX, you can change the data,
add data, or remove data, and send it back into opLYNX. Here is how:
All the data in the columns can be modified. You can either change one record or change
multiples at one time.
- OFNumber: cannot be changed. This is the unique ID of the form in opLYNX and is specific to that form, it cannot be modified.
Editing Data
- To change a forms, select the data you wish to alter, and click
 . This will allow you to use the available options to populate that cell so the formatting matches opLYNX exactly.
- You can also copy and paste into cells, as long as the information matches opLYNX’s requirements. For example, you can change the status on forms, but only certain information is accepted, ie. Created, Deleted, Expired, etc.
- You can use the Entry Control to change the dates or due dates, but these also must be formatted exactly as YYYT-MM-DD. Do not change the “Create_Date”
- Once you have made all your changes, you will want to check it for errors by selecting

- If no errors were detected, you can then hit
 to send the changes you made to the opLYNX server.
 - Users in Central can then see the changes or operators can see changes on their devices after they sync
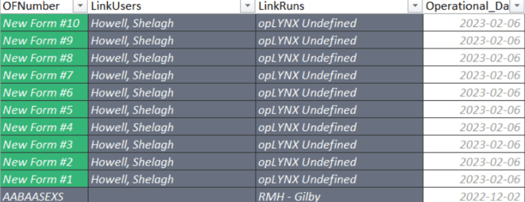
Adding Rows
- To add any rows to the spreadsheet, you are essentially going to create a new form with its own OF Number
- Select

- Type in the number of rows/forms you wish to add
- Populate the new rows with form data:
- You can change the runs by selecting
 from the ribbon
 - You can change the linked users by selecting
 from the ribbon as well.
Deleting Rows
- Forms cannot be deleted. The status can be changed to deleted, but the form will always exist to keep from losing important data. Dota can be changed or altered, but there is an audit trail to track all changes, so it will always have a record.
- The exception is that if new rows have been added but not committed, they can be deleted.
- Highlight the new form numbers you wish to delete and hit Delete in the toolbar.
Uploading Altered/New Forms Back to opLYNX
Now that you have changed data or added new data to your forms, you can send it back to opLYNX.
- Once you have made all of your changes, you can check it for errors by selecting

- If no errors were detected, you can hit
 to send the changes you made to the opLYNX server.
 - You can then logout and you do not need to save your workbook.
Profile Management Features
The following is a list of the functions and features of the Profile Management window:
Additional Features
Changing Column Order
In the Selection Profile screen, you can change the order of the column headers to appear in a different order or to remove column headers you do not wish to see.
Viewing Selected Statuses
Use the check boxes to select which form statuses you wish to return the forms for updating

Seeing Form Count
After selecting all of the profile options, you can refresh to see the form count of what your selection will return.
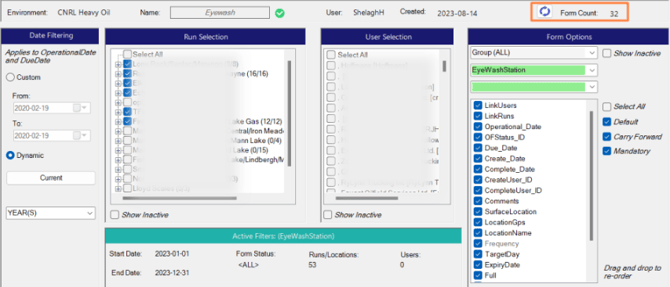
This is helpful in getting an idea of the results before pulling the data.
Tips and Tricks
The following is a list of tips to help ensure your data loads correctly without errors
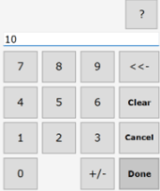
Entry Control
![]() Using the Entry Control button will ensure your answers are always formatted to meet the requirements of the form.
Using the Entry Control button will ensure your answers are always formatted to meet the requirements of the form.
- If you select one or multiple cells, you can hit the Entry Control button to see available options of answers for that cell.
- This is great for changing dates, surface location, GPS, frequency, and more.
Validation
![]() The Validate button verifies the data in the form for accuracy and errors
The Validate button verifies the data in the form for accuracy and errors
- If you have entered improperly formatted data or inaccurate data, the Validation process will check for a possible correction, if it believes one exists.
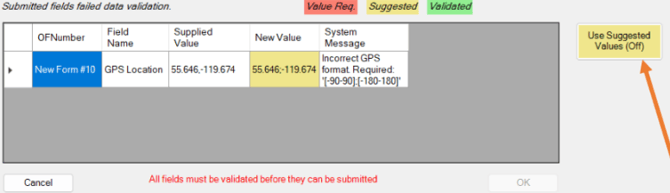
- In this example, the GPS has a comma instead of a semicolon, and the New Value is suggesting use of a semicolon. To use the suggested value, click Use Suggested Values (Off).
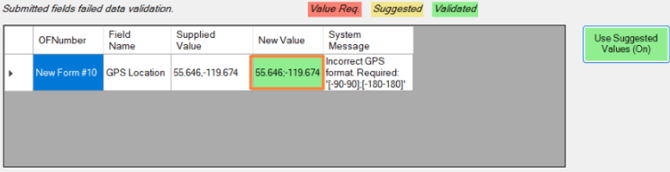
- The new value appears in green with a semicolon.
- Hi OK to accept the change.
- The Validation will complete
- Hit Commit to make the changes on the form.